Filet Crochet Butterfly: Free Chart for Beginners
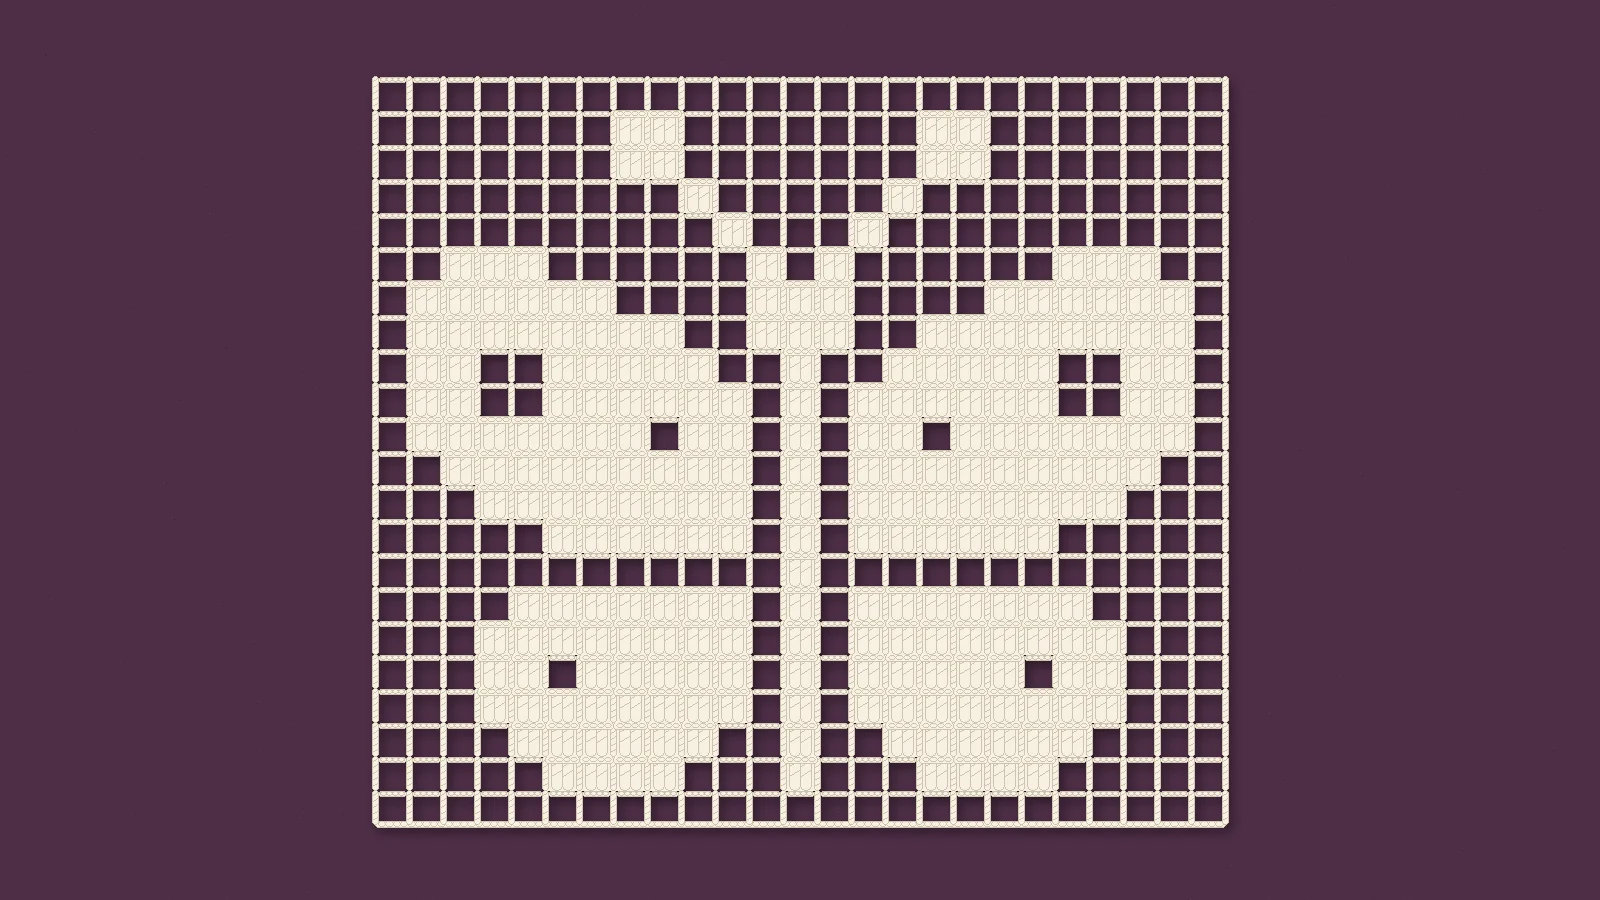
This free filet crochet butterfly is 25 squares wide and 22 rows tall: two big upper wings, two smaller lower wings, a slim body and two antennae, with open spaces in the wings so it reads as lace. In size 10 crochet cotton it comes out at about 6¼ by 5½ inches (16 by 14 cm) before blocking. Chain 80 to start; every row begins with a space.
It makes a small framed picture, a lace insert for a curtain panel or a motif for the front of a cushion. We have not crocheted this butterfly ourselves. The chart is our own design, counted square by square, and the picture at the top is a code-drawn illustration of that chart.
What you need
- Size 10 crochet cotton in one colour. Size 10 is one of the most common thread sizes, and with thread the smaller the number, the thicker the thread. We have not measured how much the butterfly uses, so start with a full ball.
- A 1.65 mm steel crochet hook, which is US size 7 in the Craft Yarn Council’s steel hook table. Steel hook numbers vary between brands, so check the millimetres on the hook.
- Scissors and a tapestry needle for weaving in the two ends.
- Optional, for blocking: spray starch, rustproof pins and a piece of cardboard or foam board covered in plastic wrap.
The stitches are chain (ch) and double crochet (dc). This page uses US terms; a US double crochet is called a treble in UK patterns.
Size and gauge
Two published size 10 thread patterns give the same filet gauge with a 1.65 mm hook: Maggie Weldon’s filet wall hanging gives 4 squares by 4 rows to the inch, and Joyce Geisler’s placemat on I Like Crochet gives 8 spaces and 8 rows to 2 inches. At that gauge:
Not every pattern agrees: other published size 10 filet work is looser, at about 3 squares and 3¼ rows to the inch, which would make this butterfly about 8¼ by 6¾ inches (21 by 17 cm). Your own swatch decides which you get.
- Width: 25 squares ÷ 4 = about 6¼ inches (16 cm).
- Height: 22 rows ÷ 4 = about 5½ inches (14 cm).
That is an estimate from published gauges, not a measurement of a finished butterfly, and it is the size before blocking. Your hand sets the real size. Crochet a small swatch of spaces first, as the Craft Yarn Council advises, and count how many squares fit in an inch. Then divide 25 by your number for the width and 22 by your number for the height. Fewer squares to the inch means a bigger butterfly.
The chart
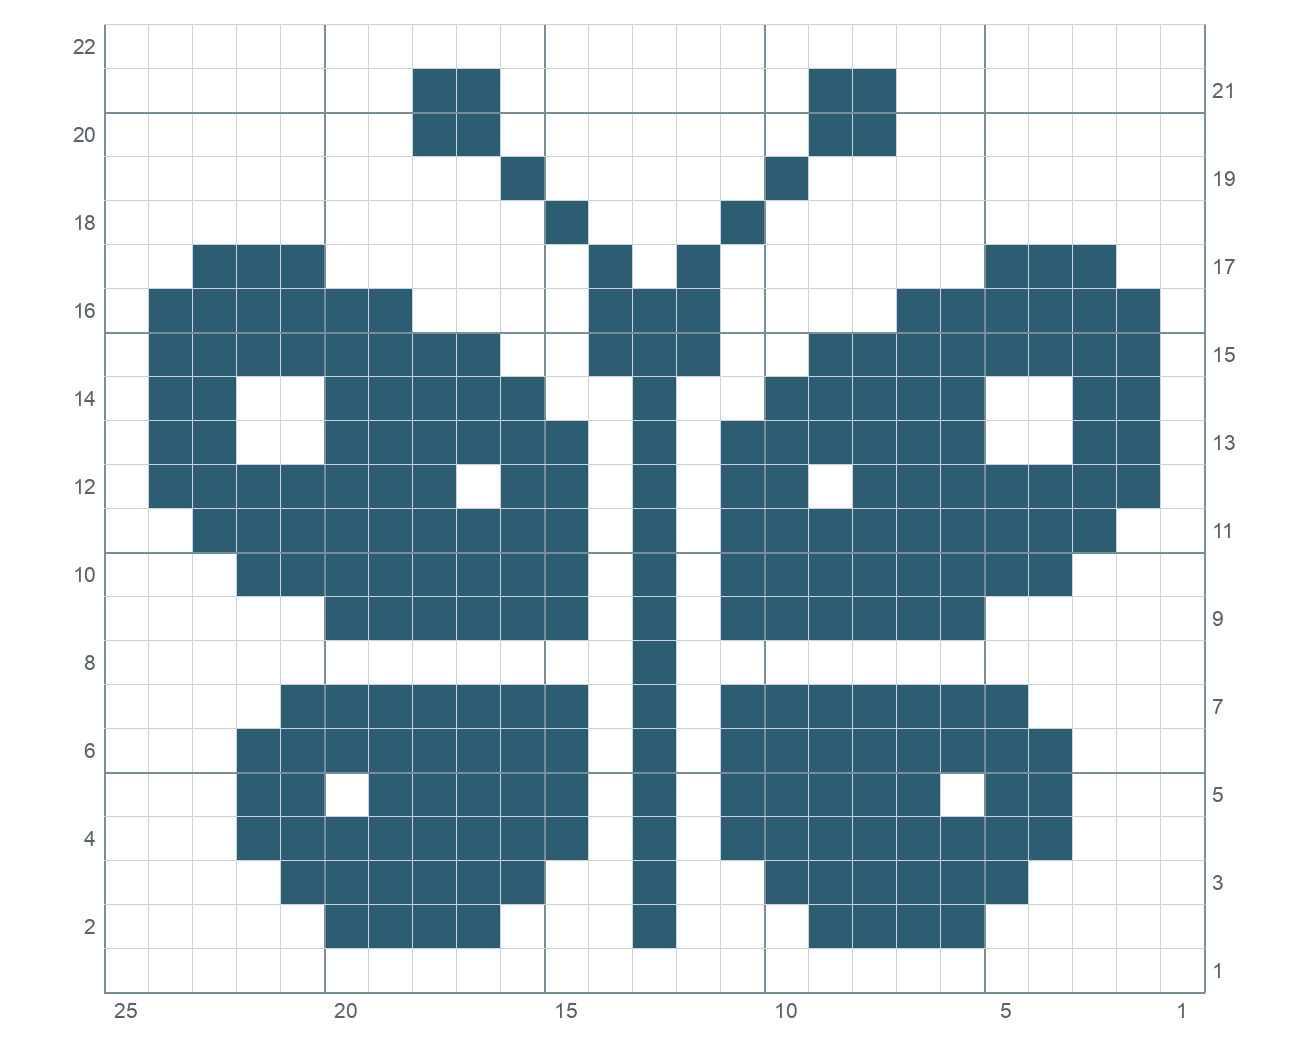
- Size: 25 squares wide, 22 rows tall.
- Foundation chain: chain 80, then dc in the 8th ch from hook (Row 1 starts with a space).
- Every row: 76 stitches, counting the turning chain as one.
- Finished size: about 6¼ by 5½ inches (16 by 14 cm) in size 10 thread, before blocking.
Read the chart from the bottom. Rows 2 to 7 are the lower wings, Row 8 is the single open row that separates the lower wings from the upper ones, and Rows 9 to 17 are the upper wings, with the head in Rows 15 and 16. The antennae climb from Row 17 to Row 21 and end in two small solid knobs. Every line of the chart is a mirror image of itself, so the left and right wings match square for square.
How to work it
Row 1. Chain 80. Work 1 dc in the 8th chain from the hook: that makes the first space. Then ch 2, skip 2 chains, dc in the next chain all the way across. You will have 25 spaces, and Row 1 is all spaces.
Turning. Every row of this chart starts with a space, so every row begins the same way: ch 5 (this counts as the first dc and the ch 2 of the space), turn, skip the next 2 stitches and dc in the next dc.
The four moves. Each square ends with a dc, and that dc is shared with the next square.
- Space over a space: ch 2, skip the ch-2 space, dc in the next dc.
- Space over a block: ch 2, skip 2 dc, dc in the next dc.
- Block over a block: dc in each of the next 3 dc.
- Block over a space: 2 dc in the ch-2 space, then dc in the next dc.
The end of each row. The ch 5 at the start of the row below counts as a stitch, so the last dc of every row goes into it: into the 3rd chain of that ch 5. On Row 2, the same spot is in the loop of 7 chains you skipped at the start of Row 1: skip the 2 chains at the top of the loop and work into the next one.
Direction. Odd rows are worked right to left and even rows left to right, which is why the row numbers sit on alternate sides of the chart. Because each row of the butterfly is symmetric, it reads the same from either end.
Finishing. After Row 22, cut the thread, pull it through the last loop and weave both ends in through the solid blocks. Block the butterfly flat before you frame it or sew it on. For a curtain or a cushion, sew it on round the edge with matching thread. To make the panel wider without changing the butterfly, add plain spaces at both sides: each extra square adds 3 chains to the foundation.
Row by row
The table gives every row in the order you crochet it, so the first square listed is the one you work first. The block and space counts let you check a row before you turn.
| Row | Work | Squares in working order | Blocks | Spaces |
|---|---|---|---|---|
| 1 | right to left | 25 sp | 0 | 25 |
| 2 | left to right | 5 sp, 4 bl, 3 sp, 1 bl, 3 sp, 4 bl, 5 sp | 9 | 16 |
| 3 | right to left | 4 sp, 6 bl, 2 sp, 1 bl, 2 sp, 6 bl, 4 sp | 13 | 12 |
| 4 | left to right | 3 sp, 8 bl, 1 sp, 1 bl, 1 sp, 8 bl, 3 sp | 17 | 8 |
| 5 | right to left | 3 sp, 2 bl, 1 sp, 5 bl, 1 sp, 1 bl, 1 sp, 5 bl, 1 sp, 2 bl, 3 sp | 15 | 10 |
| 6 | left to right | 3 sp, 8 bl, 1 sp, 1 bl, 1 sp, 8 bl, 3 sp | 17 | 8 |
| 7 | right to left | 4 sp, 7 bl, 1 sp, 1 bl, 1 sp, 7 bl, 4 sp | 15 | 10 |
| 8 | left to right | 12 sp, 1 bl, 12 sp | 1 | 24 |
| 9 | right to left | 5 sp, 6 bl, 1 sp, 1 bl, 1 sp, 6 bl, 5 sp | 13 | 12 |
| 10 | left to right | 3 sp, 8 bl, 1 sp, 1 bl, 1 sp, 8 bl, 3 sp | 17 | 8 |
| 11 | right to left | 2 sp, 9 bl, 1 sp, 1 bl, 1 sp, 9 bl, 2 sp | 19 | 6 |
| 12 | left to right | 1 sp, 7 bl, 1 sp, 2 bl, 1 sp, 1 bl, 1 sp, 2 bl, 1 sp, 7 bl, 1 sp | 19 | 6 |
| 13 | right to left | 1 sp, 2 bl, 2 sp, 6 bl, 1 sp, 1 bl, 1 sp, 6 bl, 2 sp, 2 bl, 1 sp | 17 | 8 |
| 14 | left to right | 1 sp, 2 bl, 2 sp, 5 bl, 2 sp, 1 bl, 2 sp, 5 bl, 2 sp, 2 bl, 1 sp | 15 | 10 |
| 15 | right to left | 1 sp, 8 bl, 2 sp, 3 bl, 2 sp, 8 bl, 1 sp | 19 | 6 |
| 16 | left to right | 1 sp, 6 bl, 4 sp, 3 bl, 4 sp, 6 bl, 1 sp | 15 | 10 |
| 17 | right to left | 2 sp, 3 bl, 6 sp, 1 bl, 1 sp, 1 bl, 6 sp, 3 bl, 2 sp | 8 | 17 |
| 18 | left to right | 10 sp, 1 bl, 3 sp, 1 bl, 10 sp | 2 | 23 |
| 19 | right to left | 9 sp, 1 bl, 5 sp, 1 bl, 9 sp | 2 | 23 |
| 20 | left to right | 7 sp, 2 bl, 7 sp, 2 bl, 7 sp | 4 | 21 |
| 21 | right to left | 7 sp, 2 bl, 7 sp, 2 bl, 7 sp | 4 | 21 |
| 22 | left to right | 25 sp | 0 | 25 |
Troubleshooting
A row ends with a square too many or too few. Count the upright posts: 25 squares have 26 posts, the turning chain being the first. The usual culprit is the last dc of the row, which must go into the turning chain of the row below.
The spaces look like rectangles, or some are bigger than others. Uneven tension causes this, and so does a piece that has not been blocked yet. Molly Ferriter of Crochet Spot suggests washing and blocking before you pull anything out, because blocking can stretch the squares back into shape. Keep each ch 2 the same size as you go.
The butterfly leans to one side. Count the posts as above, since an extra or missing stitch at an edge shifts every row after it. Then pin it square while blocking: measure the sides and pin to the same size on both.
The edges curl. Block it flat. Wet it, blot it until it is just damp, pin it out with rustproof pins on a board covered in plastic wrap, spray it with starch on both sides and leave it until it is completely dry. If you wash it later, block it again.
The wings blur into one shape. Check Row 8, which should be all spaces apart from the one block of the body, and the column of spaces on each side of the body. One block worked in place of a space there joins shapes that should stay apart.
Free printable PDF
Download the free filet crochet butterfly PDF (chart, starting chain and every row, 68 KB).
Sources
- Craft Yarn Council: steel crochet hook and crochet thread sizes
- Craft Yarn Council: crochet abbreviations, US and UK
- Maggie Weldon: filet wall hanging, free pattern with gauge
- I Like Crochet: Joyce Geisler’s filet placemat, with gauge
- Dummies: how to filet crochet blocks
- Stitches n Scraps: basic filet crochet
- Crochet Spot: filet crochet basics, spaces and blocks
- Crochet Spot: when filet squares look rectangular
- Moogly: how to filet crochet
- Dummies: blocking with spray starch